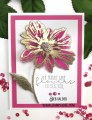
A friend of ours recently commissioned me to make a birthday card for another friend of hers. In e-mailing back and forth with her, I mentioned that I had a large rose stamp. She said that would be perfect, since she & a group of other friends were going to send a bouquet of flowers, including roses. I have actually had this rose stamp for years, and have no clue who manufactured it or what the exact name is. It has the words "Heirloom Rose" as part of the design, so that may be the name of it. (I actually masked out the words when I stamped it for this card.)
I began by cutting a piece of watercolor paper larger than I actually needed. The stamp is a cling stamp, and I wanted to use my MISTI, just in case I had to stamp it more than once. Since I couldn't see through the stamp, I erred on the side of caution with my paper size, knowing I could cut it down later. I stamped the image twice with Vanilla Cream ink, since I wanted to do no-line watercoloring.
I used my Mijello Mission Gold & Da Vinci watercolors to paint the image. It took me a few hours to paint, over 2 sessions. Not only is the image large, but it is also very detailed in the flowers. I made the mistake on the largest bloom and the one in the upper left of just kind of slapping the paint in the middle, figuring I could add in the shadows afterwards. Of course, that pretty much obscured the lines of the petals in the very center, so then I didn't know exactly where to add the shadows! I tried anyway, but made a general mess of things in the center of each bloom. I kept going, though, and made sure to pay very close attention on the bottom left flower, painting the shadows as I went. I could have gessoed over the centers of the other 2 flowers, added watercolor ground medium, and repainted. But I was working on a tight deadline, and didn't have the time to do that, since the watercolor ground needs 24-48 hours to dry. So, in desperation, I got some craft acrylic paints that were pretty much the right colors, & repainted the center petals with those. It actually worked out pretty well, if I do say so myself! Lesson learned.
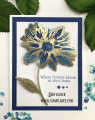
I made a trifold card base from blue cardstock. The recipient of this card has a life coaching business, and uses the word "heart" in the name. So I had the idea to die cut a heart in the front of the card base, so the roses would show through from the inside.
I heat embossed the greeting on a strip of white cardstock. I die cut the top & bottom of the strip with one of the "Stitched Scalloped Borders" dies, then adhered it to my card front, under the heart window.
I trimmed my watercolor piece to 4x5-1/4", and adhered it to the right flap of the card base, so the roses would show through the front window. As a finishing touch to that, I punched 4 photo corners from a silver shimmer cardstock, and glued them to the corners of my watercolor panel. I added the inside sentiment panel to the middle of the card base, so that the image panel folds over it. Despite the difficulties in painting the roses--and the long time it took--I LOVE how this card came out!!! Our friend told me the recipient loved it as well, and will treasure it.
Date: Saturday, September 12, 2020 GMT Views: 347
Favorited:5
Registered: February 3, 2005 Location: Delray Beach, FL Posts: 34769
Wed, Nov 04, 2020 @ 11:40 AM
Wow! Andrea, this is gorgeous, and your no-line watercoloring is out of this world! The centers of the roses are perfect, and I love the richness of your color. Totally in love with the card as the heart shows some of the rose cluster before it's opened. Stunning card, sweet friend! It's one of my favorites of yours! Hugs!
------------------------------ Cheryl
Proverbs 3:5-6 My blog