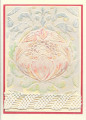
I used the side of my pencils to color the embossed image, taped down the edges and then sprayed with water to activate and intensify the colors. It really was quite vibrant. I laid the paint across the top of the paint and squeegeed down as if silk screening. Placed in the sun outside to dry quickly. Sanded the paint off and then clear embossed the panel. Added the crochet lace and decided on no sentiment, because I think it would fit several occasions. Fun and quite surprising at the transformation.
Date: Monday, July 13, 2020 GMT Views: 290
Favorited:3
Registered: February 23, 2016 Location: El Paso, TX Posts: 22818
Mon, Jul 13, 2020 @ 4:03 PM
That’s a really different looking embossing folder. I like the colors you used here And your lace edging makes me think of macramé which is what I first thought maybe you had done yourself.
------------------------------ Linda aka Bubbles
I'm not a Hoarder . . . I'm the Curator of an extensive collection of embellishments!!
Proud Fan Club Member Guest Designer Color Challenge July 2017 Favorites Notification Team
Splitcoast Dirty Dozen Splitcoast Challenge Host Proud Fan Club Member
Registered: April 11, 2016 Location: Posts: 30055
Mon, Jul 13, 2020 @ 7:00 PM
So soft and pretty. TFs. Happy day
------------------------------ The Difference Between Try and Triumph Is Just A Little Ump Wednesday: Alpha Challenge
Thursday: Ways To Use It Challenge
Monthly: MMJ Challenge….get inky and have fun
Registered: March 20, 2008 Location: Hamilton, Ontario Canada Posts: 615
Tue, Jul 14, 2020 @ 8:34 AM
Some of my best experiences creating card art have been when I've gone outside the box, thinking that all I was making was a muddy mess (which has also happened ;)), then I was astonished that I had created something so wonderful. This is truly glorious, and I can only imagine that in person it looks even more creative and wonderful! That texture at the bottom just finishes it off beautifully, so truly artistic in a very cool inked and embossed way, wow!!!