This card was inspired by a combo inspiration photo and sketch card challenge. I used both in designing my card.
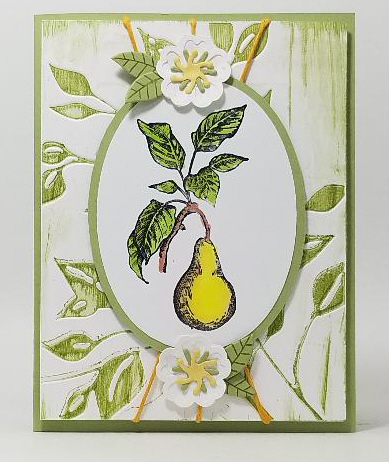
The embossed front panel was created by swiping a Stampin' Up! (SU) Pear Pizzazz ink pad across the inside of a Cuttlebug embossing folder, then running a piece of white cardstock in it through my Big Shot. I like how the ink pad put a stripe in the upper right corner which otherwise would have been a big blank white area. Since the inspiration photo had a vintage look to it, I think this gave the background more of an "old-timey" look.
The center oval image was created by stamping a botanical-looking pear stem using black ink using my stamp positioner, then stamping again using Versark. I then dusted the wet ink with clear embossing powder and heat set. I like to do this for images that I plan to color with alcohol marker since stray embossing powder is clear and wouldn't show up like black would, and also the black image becomes more intense, and it helps keep the alcohol ink from straying outside the image lines.
After the image was colored with markers, I used an oval die to cut it out. Since this was my largest oval die, I then die cut the oval again using a scrap of black cardstock, and with my digital scanner/cutter I scanned the oval, added a 0.012" border around it to make it larger than my die-cut pear oval, and then cut the larger oval out of SU Pear Pizzazz cardstock. After gluing the two ovals together, I added two large pieces of craft foam cut using the same oval die, and trimmed the foam to allow the planned yellow jute twine to pass between the foam pieces that I glued to the back of the green mat oval.
I tried wrapping the yellow twine around the leafy embossed main panel, but the cardstock was so thin that it buckled. So, glued a piece of thicker white cardstock to the embossed panel to stiffen it. Then it was easy to wrap the twine.
After mounting the matted oval, my card still didn't quite match the challenge sketch, which had a flower at the top and bottom of the central oval. So, I did some research on what pear blossoms looked like and found a five-petal digital flower SVG file that had both the simple flower, and a outline version of the same flower. I used my ScanNCut to cut out both versions since I liked how these looked stacked. The center green and yellow pieces were die cut using the SU "Botanical Builder" die set. I "cupped" all 4 parts of the flower using the rounded end of my metal paper piercer to make them look more real before gluing them together. They seemed to be "floating in mid-air", so I grounded them by stamping leaf veins onto SU Pear Pizzazz cardstock using the same color ink, then die cutting the 4 leaves out using the matching SU "Botanical Builder" die set.
This card wasn't particularly difficult, but it did require several different techniques that together might prove challenging to a beginning crafter. So, I am rating the difficulty level as a "3" out of a possible "5". I think this card could be used for just about any occasion.
Date: Tuesday, May 26, 2020 GMT Views: 225
Favorited:2