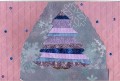
I made this Hanukkah card for a friend of ours who is blind. I always try to make her cards not only visually appealing, but also tactile so she can enjoy them. I also "wrote" the greeting (Happy Hanukkah) in braille on the greeting strip.
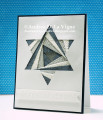
I found a diagram for an iris folded Star of David online, but it wasn't printable, & couldn't find any other one to print. I did find a Star of David image on Pixabay.com that I downloaded and opened in Photoshop, to use as an outline to make my own pattern. I sized it for a 4x5.25" panel, with about 1/2" margin on the top & sides, and started working on my pattern. I opened the diagram I'd found in my browser, and switched between it & Photoshop to make the lines for the pattern. While I worked, I found that the iris folding diagram was basically a series of triangles, each one turned & sized smaller relative to the next one up. So, rather than just drawing lines, I switched to the custom shape tool in Photoshop, chose the solid triangle, & just drew them in different colors to keep everything straight what went where. I did have to use the distort command to adjust the angles, and rotated the triangles into position. Then I switched to the line tool, and traced each triangle, so I wouldn't use as much ink when I printed the pattern. (I did delete the triangle layers after I'd drawn all the lines around them.) I numbered each section, following the diagram, and printed the pattern onto a piece of copy paper. I also printed just the outline (minus all the inner lines) of the star on the back of a white cardstock panel.
I used a craft knife & metal ruler to cut the star window from my panel. I taped it with painter's tape over the pattern, with the panel face down. I cut a few strips of patterned & handmade papers to 3/4" wide, and scored parallel to the long edge at 1/4", then folded that. After that, it was just a case of lining the folded edge of each strip along a line of the pattern, and taping it in place. I did trim the lengths of the strips as I went. I worked my way from the outside of the pattern in. Finally, I taped a piece of silver glitter paper to cover the center portion. Considering I had to make my own pattern, I am really pleased with how this came out!
To finish the card, I added the panel to a navy mat with foam tape. The strips behind the star created quite a bit of bulk, so I went with foam tape to avoid a "bulge" in the middle of the panel. I created the greeting on heavyweight white cardstock, trimmed it into a banner, and popped it up on the card as well. I will hand deliver this card, so no worries about dimension!
Date: Sunday, December 29, 2019 GMT Views: 2157
Favorited:5
Registered: August 10, 2006 Location: Sunny Florida Posts: 25290
Sun, Dec 29, 2019 @ 9:17 AM
Wow, Andrea! I love IRIS folding, and you did a great job creating this IRIS folded card from your own pattern! The addition of Braille is so perfect for your friend. You are a wonderful friend to the recipient of your beautiful card to expend much effort to create it! Love it!
Registered: February 23, 2016 Location: El Paso, TX Posts: 23018
Sun, Jan 12, 2020 @ 12:04 PM
Congratulations! In the Favorites Forum, you're in the Favorites for the two week period ending January 11, 2020.
Everyone is welcome to participate in the weekly and end of year Favorites threads. If you've never taken part before, click THIS LINK for some helpful tips.
To find out who brightened your day by listing one of your cards, click THIS LINK and check post #40
------------------------------ Linda aka Bubbles
I'm not a Hoarder . . . I'm the Curator of an extensive collection of embellishments!!
Proud Fan Club Member Guest Designer Color Challenge July 2017 Favorites Notification Team