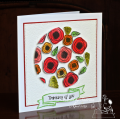
This is the second card, made with the inside of my Floating Frame (you can see the first card HERE.
I bought a card magazine recently, something I rarely do, and wanted to try this technique. It takes a lot of time, but it's a two-for-the-price-of-one, as you get the frame (first card) and the shape left after you've cut the frame (this card).
Stamp and die-cut (I fussy cut, it's faster!) images and lay them face-up over a piece of card slightly bigger than your card front. Lay them quite close together without too many gaps. Using something like Press n Seal, lift them all up in this position. Lay the Press n Seal on a cutting mat with the outer die and whatever shape you want for the inner frame, and run through the Big Shot.
Now the tedious bit - apply foam tape/squares to the back of every little piece. Then put your card on top and turn over. If everything has gone well, all the bits are still in position and you have all those little die-cut elements popped up and an aperture in the centre. I didn't plan ahead and probably cut my aperture too big, it was hard then to find a sentiment big enough to fit. Lesson learned - but it gave me a nice big circle for this card. I added it to a square of card embossed with a brocade-style ef and matted it on red. Added a banner sentiment and that's it.
Date: Wednesday, April 17, 2019 GMT Views: 1272
Favorited:3
Registered: December 4, 2010 Location: Minnesota Posts: 16610
Wed, Apr 17, 2019 @ 3:14 PM
This 2nd version is really gorgeous too Sabrina. I love the embossed background behind this wonderful circle of dimensional flowers. I am impressed with all the fussy cutting you did too! I would be hard pressed to say which one is a favorite because I love both cards a lot! Thank you for the wonderful inspiration on this Sabrina. ~Karen.