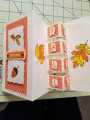
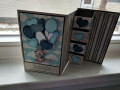
A friend of ours has a 90-year-old aunt whose husband passed away a few months ago. The aunt has had to be moved to an assisted living facility, and our friend wanted to send her a very special card for Valentine's Day. So she asked me to make one. No specific requirements--just make a card. So of course, I had to go a bit over the top with my design! LOL (The photo is actually of the card front and the inside panels together.)
Initially, I wanted to back my card with another piece of cardstock, so the main card base would have a slight mat, as suggested in the Building Block Card tutorial. Unfortunately, I never could get the mat layer & main card base layer to play nicely with each other. I tried 3 times before finally giving up on that idea. This card is actually my 4th (and final!) go at this project.
For this final time, I cut a piece of Butter Mint cardstock to the 10.5x5.5" specified in the tutorial. I scored the main folds, cut the slits for the blocks (by now I had memorized the measurements for those slits!), and scored the lines for the ends of the blocks. This time, rather than back the whole card base, I decided just to back the area immediately behind the blocks. I just didn't want the recipient (or anyone else viewing this card) to see air behind the block openings. So I cut another piece of Butter Mint to 3.5" wide by maybe 6.5" high, and scored it down the middle. I backed the valley-fold strips between the blocks in the card base with 1/8" Scor Tape, and adhered my folded piece to them. I also ran a line of tape above & below the block area on the back of the card, & along the 2 long edges of my backer piece. Finally, I trimmed off the excess of my backer panel above & below the card base. Maybe not as "neat" looking as a full mat layer would have been, but it worked much better than my previous 3 attempts!
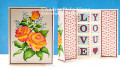
I die cut the letters & a heart from burgundy cardstock, and glued them to squares I'd punched from a light teal cardstock. I actually got the idea for the teal from the striped paper in the My Mind's Eye pad, which I used to back the squares. I cut 1.5x1" rectangles from that paper, and backed my teal squares with that before gluing them to the blocks. I matted the bird pattern from "Valentine" with burgundy, and adhered those panels in place.
For the front, I wanted to use an image that was suitable for Valentine's Day. I have some images from Doodle Pantry's "With Heart" set (discontinued), but they are all critters & I don't know if our friend's aunt likes that sort of thing. Then I decided on roses, but didn't know what color. I have the "Classic Roses" stamp in my collection--from years ago--and found an image online of roses whose coloring went from yellow on the inner parts of the petals to pink along the edges. Voila! So I stamped the image onto watercolor paper with Fade-Out ink, and painted it with my Mission Gold watercolors. This was the first time I used this ink with watercolors, and I had no problems whatsoever. I've heard comments from card makers on YouTube that they didn't seem to feel there was really a "no-line" look, since there were still visible lines after painting. But for me at least, the lines seemed to disappear quite well. So I don't know if they are using a different paint or paper or what, but it worked fine for me!
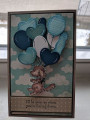
After I finished painting the image, I matted it with more burgundy, and adhered it to the front panel. I had cut my watercolor panel to 3.75x5", and matted it to 4x5.25". Since the finished card could be up to A2 in size (with the envelope I was providing), I simply adhered the panel with a 1/8" border on the top, bottom, & left side of the card base, and having it hang off the right of the card base front. Despite all the false starts, I really like how this card came out in the end. And our friend absolutely went wild over it! So hopefully her aunt will love it, too!
Date: Saturday, February 16, 2019 GMT Views: 1241
Favorited:5
Registered: August 10, 2006 Location: Sunny Florida Posts: 25290
Sat, Feb 16, 2019 @ 8:06 PM
WOW! What marvelous roses, Andrea! You colored them so beautifully! The inside of the card is perfect for the situation. I'm sure the aunt will be delighted with the stunning card! I sure would be delighted. Love it!
Registered: March 20, 2008 Location: Hamilton, Ontario Canada Posts: 615
Sat, Feb 16, 2019 @ 8:57 PM
I especially love the colors you have chosen to paint these roses and leaves and tiny flowers, and I like how you have emphasized the tiny blue flowers by using some gorgeous patterned paper behind the card when photographing which really makes those roses and leaves and flowers just pop. The roses are just stunning and the greens you have used for the leaves are really beautiful.
I am looking for some watercolors, I do have Zig real brush markers and Twinkling H2O's but no real watercolors in pans or tubes, and I need at some point to find something reasonable for a beginner that will give hopefully good results and will be watercolors I will want to grow with and into...hopefully I will improve over time.
This card is just glorious, I'd say you made this lady's Valentine's Day extra special and that is needed since it's her first such day without her beloved husband. I am sure that your card brought great comfort to this woman, what is better than this!
Registered: December 9, 2005 Location: Tucson, AZ Posts: 2505
Sun, Feb 17, 2019 @ 3:48 PM
WOW!!! Your roses are simply stunning!!! I'm in total awe!!! I'm sorry for the circumstances that the card was made, but I'm sure she appreciated it so very much!
------------------------------ ....~Tanya~....My Blog
Registered: August 10, 2006 Location: Sunny Florida Posts: 25290
Sat, Jan 04, 2020 @ 1:49 PM
Congratulations! In the Favorites Forum, you're in the Favorites ~ Best of 2019 thread.
Everyone is welcome to participate in the weekly and end of year Favorites threads. If you've never taken part before, click THIS LINK for some helpful tips.
To find out who brightened your day by listing one of your cards, click THIS LINK and check post #7