Registered: June 2, 2004 Location: San Diego, CA Posts: 1415
Tue, May 30, 2006 @ 7:28 PM
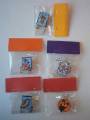
To make the pins: I prefer the rectangle D style stone from www.ClearSnap.com. The back of the style stone has lines on it. Pour 91% Isopropyl alcohol, found at the drug store usually on the shelf below the 70% rubbing alcohol, in a small cup. Stamp your image with StazOn and heat set. No need to prep the stone. After it cools it�s ready to color. Scribble the watercolor crayon on the lid of the tin they come in, and using a small paintbrush dipped in the alcohol, pick up the color off the lid and paint your image. It may take a few layers to get a deep color, but just keep adding until you like it. After the front is done, take a cotton ball dampened with alcohol and pick up the color off the lid. Dab it on the back of the style stone. Then, color the sides with a black Marks-a-Lot marker. They have a perfect tip for beveling the color onto the front edge of the style stone. Looks somewhat like a frame when you�re done. Then, seal the stone with Krylon fixative. I use a matte finish spray, and coat each side twice. After it�s dry, adhere the pin back with Crystal Effects. I bead them using SU wire, 26 gauge is my favorite to use, and SU beads. The style stones have predrilled holes, and each can take 2 to 3 strands of 26 gauge wire. Have fun with them!
Registered: March 12, 2005 Location: Carlsabad, CA Posts: 445
Fri, Jul 21, 2006 @ 10:32 AM
Love these Rubba Sista... I sure wish I was with you and Tina this week. It had to be a blast. I love the pins, you need to teach me that some day. See you in the month.