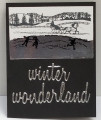
The color of silver always reminds me of winter because of glistening ice, so I immediately thought of my 2002 retired Stampin' Up! "Winter Wonderland" stamp set that included a winter scene with kids skating on a pond.
I started by stamping the scene with Stazon Jet Black ink onto a piece of SU Whisper White cardstock. Then, I covered a scrap piece of the same cardstock with shiny silver furnace tape I had bought at Lowe's for a DIY furnace repair project. I stamped the same scene with Stazon onto the silver tape using my MISTI. For some reason, no matter how many times I re-stamped the scene, the larger black areas of the children wouldn't stamp solid black. So I used a black Sharpie pen to fill in the "holes" to make the silhouettes solid.
After the silver tape image was dry, I used a pair of paper snips to cut the rough-edged "pond" out of the tape. I glued the pond over the top of the image on the Whisper White cardstock. After the glue had dried, I used my paper trimmer to cut all four edges of the glued piece to create an even-sided rectangle about 4"x 2". I then glued this piece to the SU Basic Black card base.
Next, I used the sentiment "winter wonderland" from the Sizzix Tim Holtz "Seasons Greetings" thinlits die set to die cut a piece of silver tape covered scrap. The pieces came out of the dies much easier than I expected! These were glued onto the card base under the snowy skating scene using Tombow glue.
The card came together pretty well, so I am rating it a difficulty level of "2" out of "5" just because of the care you need to take to carefully glue the sentiment down without making a mess. Because the diecuts are so "stretchy", I felt it would be almost impossible to run them through a Xylon machine to put a sticky back on them, then pull them off. If you have success using this technique for such thin stretchy diecuts, please tell me your secret!
Date: Monday, July 16, 2018 GMT Views: 594
Favorited:2