Design Team member, Dianne Keough, created a fantastic video on all the ways you can do paper tearing! I chose her first method, which is simple paper tearing.
I had seen a pretty card on Pinterest by Rochelle Block that used the Stampin' Up! "By the Tide" stamp set as an undersea card. I really liked it, so I adopted her card with my own choice of stamps and coloring.
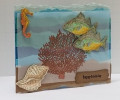
I started with a card base slightly narrower than the standard A2 size, because I wanted my paper tearing to extend as rough edges on the top and bottom of the front. My starting card base size was 8-1/2"x 3-1/2", folded in half to create a landscape oriented card.
I had four different shades of blue cardstock scraps that were at least 5-1/2" long, I tore two of each of the colors using the paper tearing technique Dianne demonstrated in her video. Using Tombow glue, I glued each strip down starting at the top, and overlapping each strip. When I got to the bottom, I used torn strips of Kraft cardstock to form the sandy bottom.
The beautiful coral was created on a piece of SU vellum using the coral stamp from the SU set "By the Tide". I stamped it with Versamark, then dusted the stamped image with copper embossing powder. It was heat set with my heat tool. The vellum was then trimmed to be slightly smaller than the card front so that the torn pieces formed a matting by peaking out all around the vellum.
The fish, conch shell and seahorse were all stamps from the "By the Tide" set as well. They were all stamped by first inking the stamp with Versamark, then taping the stamp in SU Crumb Cake ink. They were then dusted with clear embossing powder, and heat set. I hand colored each image using Copic markers:
Fish: BG72 (Ice Green), G02 (Spectrum Green), Y15 (Cadmium Yellow), and Y17 (Golden Yellow)
Seahorse: R22 (Light Prawn), and &17 (Golden Yellow)
Each of the stamped images (except the coral) was hand cut out with paper snips. The top fish was attached to the vellum using Tear & Tape (extra strong adhesive tape). The second fish, shell and seahorse were all backed with pieces of thin chipboard (like comes with a paper pad), and attached to the vellum with Tear & Tape as well.
Finally, the sentiment was stamped with Versafine Onyx Black ink (because the letters are so tiny) onto Kraft cardstock, then punched out with the retired SU "Modern Label" punch. It was mounted with thin strips of adhesive foam strips.
Because of all the coloring, hand cutting, and multiple steps, I am rating the difficulty for this card as a "4" out of "5". I think it will make a great "guy card"!
Thank you, Dianne, for the great instructions and examples!
Date: Tuesday, June 12, 2018 GMT Views: 712
Favorited:2