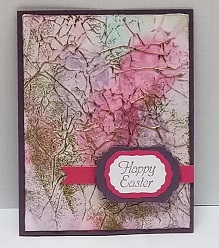
This card was made for Try Stampin' on Tuesday Challenge #359: http://trystampinontuesday.blogspot....359-green.html The sketch this week is a very straightforward one, but of course I am always looking for an excuse to try new techniques. This week I'm trying "Gilded Faux Silk" because it looks so great with either "Easter colors" or more dark colors. For a great photo and video tutorial, please visit: Gilded Faux Silk Tutorials at Splitcoaststampers
I started by stamping an ornamental Easter egg all over a piece of tissue paper larger than my front card panel using four different "Easter colors" (Stampin' Up!'s Melon Mambo, Coastal Cabana, Perfect Plum, and Wild Wasabi). I then crumpled up the tissue paper into a tight ball, then semi-flattened it out, I slathered Tombow Multipurpose Liquid Glue all over my 4"x5-1/4" panel of Whisper White cardstock and laid the crumpled tissue paper on top of the glue so that the paper extended beyond all four sides of the panel. DO NOT press out the wrinkles, but gently adhere the tissue allowing the wrinkles to remain. After the glue has dried, spritz your tissue paper with water to make the colors run (and thereby making the colors softer). Allow this wet sandwich to dry (probably overnight like I did). The paper will warp, but we'll take care of that later.
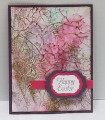
Lightly touch your Versamark ink pad to the dried panel so that all the crests of your wrinkles get inked. Don't press too hard, or you'll get the flat parts of the panel inked, too. Sprinkle gold embossing powder on the panel and shake off the excess that doesn't stick. Then set with your heat tool. Either cut off the excess tissue paper where it extends beyond your white cardstock, or wrap it around and glue it on the back.
Because the water spritzing causes the white cardstock panel to warp, I put Wonder Tape (that super sticky tape that has a read backing) over the entire back of the panel as close to the edges as possible. This allowed me to stick the warped panel down flat onto the Perfect Plum card base.
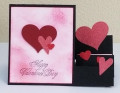
The Easter sentiment is from SU's retired "More Great Greetings". It was stamped onto Whisper White cut with Spellbinder's "Labels Four" Nestabilties dies. I created the pink mat by using the same die, and tracing around it, then cutting it out by hand. The purple mat was the next size up die, that I cut out with my Big Shot.
The horizontal banner was hand cut on my trimmer, then flagged with a pair of paper snips. The banner was attached using Wonder Tape (because of the uneven surface of the gilded wrinkles), and the matted sentiment element was attached with adhesive foam strips.
I like the effect the Gilded Faux Silk technique creates, and will use it again!
Although there are a lot of steps in creating this card, it wasn't too hard, so I am rating it as a "3" out of "5" in terms of difficulty.
Date: Friday, February 2, 2018 GMT Views: 1402
Favorited:5
Splitcoast Dirty Dozen Splitcoast Challenge Host Proud Fan Club Member
Registered: April 11, 2016 Location: Posts: 30055
Fri, Feb 02, 2018 @ 10:09 PM
This is absolutely beautiful. TFS Happy day
------------------------------ The Difference Between Try and Triumph Is Just A Little Ump Wednesday: Alpha Challenge
Thursday: Ways To Use It Challenge
Monthly: MMJ Challenge….get inky and have fun