This card was made for Try Stampin' on Tuesday's first Tic-Tac-Tuesday Challenge (http://trystampinontuesday.blogspot.com/). The tic-tac-toe set I used was focusing on the center horizontal row (step card, heart, and sponging), but in fact, I used every spot on the tic-tac-toe diagram except "lace". I am making this for my husband for Valentines Day, and he just isn't into lace :-)
I used regular weight black cardstock, but I STRONGLY recommend you use a thicker cardstock to give the card more structure.
Here is "Our Daily Bread" EXCELLENT tutorial on how to make a side-step card: http://ourdailybreaddesignsblog.blog...lus-super.html
You can also find several other tutorials online at Pinterest by searching for "side step card". There are variations you can choose among for size of paper, width of steps, etc.
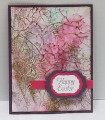
I cut the main Stampin' Up! Whisper White panel 3-1/4"x4", then used a sponge to first put light pink swirls as filler using SU Melon Mambo ink. Then did highlights by sponging SU Real Red to add depth to the panel. I glued the sponged panel to the left side of the card base using Tombo glue.
Next, I create the waterfall of hearts using the "paper piecing" technique. You can find a description of this technique on my blog at: https://devisedbydonna.blogspot.com/...aper%20Piecing. Basically, the technique is to die cut your "background" figure, in this case the largest heart, then die cut the shape you want to be "in the middle" out of your background shape to leave a "hole" into which you place the middle shape (in this case my wonky tall heart). The last step is to then die cut a third heart (the tiny red one) out of the wonky heart, and fit the tiny heart inside the hole. To make this easy, I usually place a piece of single-sided Scotch tape on the back of the background shape (big heart) after I die cut the middle heart hole, so that when I stick the wonky heart into it's spot, it has tape to hold it in place. Do the same with the smallest heart after you die cut it's hole.
On the back of the heart cascade I placed several small adhesive foam strip pieces to raise the cascade up off the surface of the card for added dimension.
The Valentines greeting (from the retired SU More Great Greetings) was stamped with Memento Tuxedo Black ink at the bottom of the card.
I cut extra hearts that were glued to the three "side steps" on the right side of the card. Since the card base is black, I needed a small spot to write my note to my husband, so cut a small piece of Whisper White cardstock and sponged it similarly to how I had done the front panel on the card. You can barely see it peaking up under the large heart on the back step on the right side of the card.
I'm giving this card a difficulty rating of "2"out of "5" because with the tutorial template, it's really much easier to make than it first appears. Without the template, I'd give it a rating of "99"! :-D
Date: Tuesday, January 2, 2018 GMT Views: 470
Favorited:2