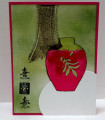
I thought I'd try recreating the inspiration photo using stamp sets and card crafting techniques.
I began by sponging a piece of watercolor paper using three shades of green Stampin' Up! ink (Garden Green, Certainly Celery & Wild Wasabi) for the background. I then used the color swoosh stamp from the SU Work of Art set to create the background tree (just stamped twice, but inverted the swoosh for the second stamping to create a "tree" with a larger base than trunk).
Next, I die cut the largest oval from the SU Layering Ovals Framelits Die set to create a table-top. Glued it down with Tombow glue so that it appeared to go off the stamped space.
The next step was to create the clear glass vase filled with pink lemonade.I used masking tape to tape down the Dreamweaver brass vase stencil onto the "table". First I used the translucent embossing powder to create the "unfilled" upper portion of the vase so when it dried it would look glossy like glass. Then I used a silicone craft mat to mix white Embossing Paste and SU Melon Mambo re-inker fluid to create the shade of pink I wanted for my "pink lemonade". I spread this colored paste on the lower portion of the vase so that it looked like it was filled with pink lemonade. When I had finished, I immediately lifted the stencil and let the paste dry overnight.
The next day, I used the ornament dies from the SU Card Front Builder Thinlits Die set to create the "strawberries". I did this by cutting off the top of the ornaments, then using a black gel pen I dotted "seeds" on them. Each "strawberry" was attached so it seemed to be floating in the lemonade using Mini Glue Dots. The green frond was die cut from the SU Botanical Builder Framelits Die set. It was glued down with Tombow glue. I also used my black gel pen to outline the vase to make it stand out from the background.
Finally, I taped together three Asian characters ( Happiness, Love, and Long Life) using masking tape to align them in a vertical stack, and stamped them with SU Basic Black ink on the lower left side of the card. Although the original inspiration image didn't have any characters on it, I felt my card needed something to establish a base to the card and give it a theme.
I'll admit no one would mistake my card for the real thing, but it was fun to come up with ways to try and recreate the inspiration image.
Date: Saturday, September 30, 2017 GMT Views: 509
Favorited:2
Registered: September 24, 2011 Location: Posts: 88
Sun, Oct 01, 2017 @ 4:41 PM
You have done such an awesome job of recreating our photo Donna! I love how you went about creating all the details and the shine and texture details must be amazing in real life! Thanks for sharing with us at Just Add Ink this week. Jan x
Registered: November 23, 2011 Location: Port Macquarie, NSW Posts: 80
Mon, Oct 02, 2017 @ 2:47 PM
Wow this card is amazing. So much work has clearly gone in to it. I love how you reproduced the inspiration image. Beautiful! Thank you so much for joining us this week at JAI - Chlo x