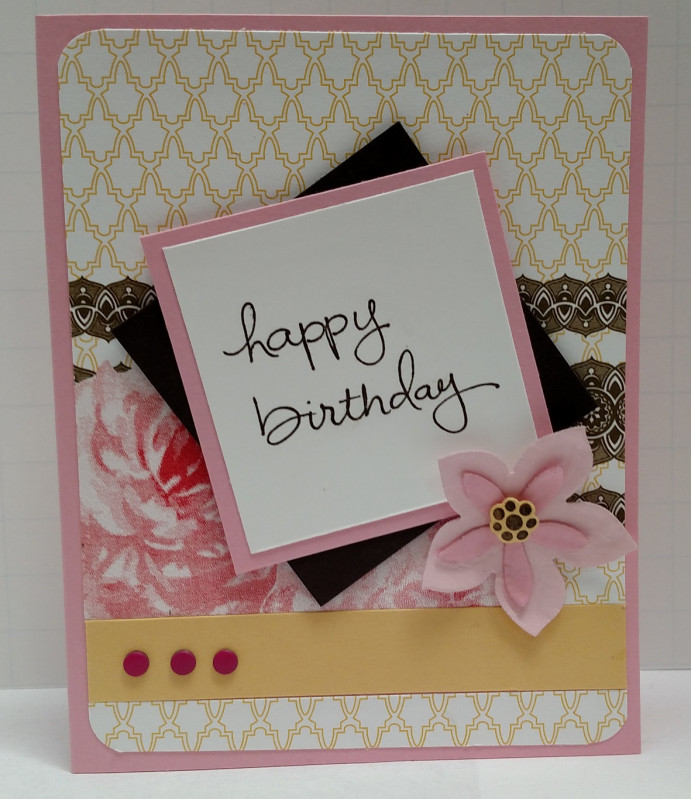
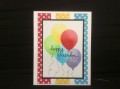
When I saw the horizontal stripe element in the sketch, my mind quickly turned to one of the gorgeous papers in the retired Stampin' Up! Designer Series Paper called "Sweat Pea". I've had the paper for a LONG time, but never found the right card to use it for... well, today I did! I use my color palette based on this paper: So Saffron, Pretty in Pink, Pink Pirouette, and Early Espresso.
I cut the DSP so the brown lattice fell approximately where it needed to be, allowing for a solid element so Saffron below it, then just a sliver of a scrap piece of the yellow lattice trimmed to size and rounded at the two bottom corners. This by far was the hardest part of making the card because of the careful measurements needed to create the 5-1/4"x 4" assembled piece. These three pieces were then glued to the Pretty in Pink card base using Tombo Multipurpose Liquid Glue.
Next, I cut a 2-1/2" square each of Early Espresso and Pretty in Pink cardstock. The Whisper White sentiment panel was cut as a 2-1/4" square. I've found that using the MISTI tool really helps align individual stamps because of it's etched grid (and is handy in case I have to re-stamp the sentiment a second time). So, I positioned the small white card in the MISTI and stamped the two-word "Happy Birthday" sentiment using Early Espresso ink. This white panel was glued onto the Pretty in Pink card, which was in turn glued askew onto the Early Espresso panel. This assembled element was then mounted on the card using Adhesive Foam Strips.
The sketch had a flower overlapping the birthday sentiment, so using the SU Flower Fair dies, I die cut the two blossoms from Pink Pirouette and Pretty in Pink cardstock. Picking up on the So Saffron lattice in the paper, I stamped an Early Espresso flower center form the SU Flower Patch stamp set, then die cut it using its matching die from the SU Flower Fair die set. This small yellow flower center, and the two die cut flower blossoms, where given texture by using the rounded end of my scoring stylus with the blossoms and flower center laying on a rubber mouse pad. Repeated use of the stylus softened the blossoms, and gave then 3D dimension. The flower was assembled with Mini Glue Dots and attached to the card front.
The final step was to place the three Rose Red Candy Dots in the lower right as specified by the sketch.
The result is a very feminine birthday card for that special friend or relative who I hope enjoys what I've created!
I've rated the card as a difficulty of "4" because of all the measuring and cutting needed for the DSP layer, and the detail work required for the 3D flower.
Date: Thursday, July 27, 2017 GMT Views: 541
Favorited:3
Registered: June 4, 2009 Location: Deatsville, Alabama Posts: 81814
Sun, Apr 29, 2018 @ 7:40 AM
Super pretty!!!
------------------------------ Nancy Williams - Hope your day is Spirit-filled and ink-filled (in that order)!DRS Designs-DT, Punchkateerforever, Dirty Dozen Alumni