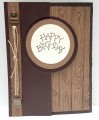
I started out cutting the flip card using Stampin' Up's Circle Card Die. To make it just a bit fancier, I used a full 8 1/2" length x 5 1/2" wide piece of Early Espresso cardstock. The part of the cardstock that extended beyond the edge of the die was fit OVER THE TOP of the die so it wouldn't be cut. When it was run through the Big Shot, a score line was created where it was on top of the die - giving me a nice fold line to fold under the circle for extended area on the inside of the card for writing a sentiment or note. (See for a tutorial on how to do this simple step.)
I stamped the hardwood pattern on a piece of Kraft cardstock, and glued this down on the FRONT side of the extended fold so the pattern would show before the recipient opened the card. I also cut two 3/4" strips of this hardwood pattern to use under the bakers twine, and to glue on the backside of the card to reinforce where I was going to attach the antique brass hardware (to prevent the card from bowing).
The die automatically creates a nice circle that flips when the card is open, so to decorate that I die cut a circle from Kraft cardstock, and then an even smaller circle from SU Very Vanilla cardstock onto which I stamped the birthday sentiment (sentiment is from the 1995 SU stamp set titled "Button Bow").
The twine embellishment was created by using a hole punch to make a hole through all three layers of cardstock (front & back hardwood strips sandwiching the Early Espresso card base). I attached the antique brass "bales" using a matching brad at top and bottom of the hardwood strip, then strung bakers twine between them tautly and tied a simple knot.
Although the die makes this card way easier than it might have been, I rated it a "3" because of all the measuring and cutting for the hardwood panels. To make it easier for you, here are my measurements:
Kraft Circle: 2 3/8"
Very Vanilla Circle: 1 7/8"
Large Hardwood Panel: 5" x 2 3/8"
Two Hardwood Strips: 1/2" x 5 3/8"
Placement of holes for hardware brads: 3/8" from outside edge; 1/2" from both top and bottom of card.
Date: Thursday, November 24, 2016 GMT Views: 2285
Favorited:9
Registered: January 20, 2012 Location: Blackfalds, Alberta, Canada Posts: 82
Thu, Nov 24, 2016 @ 5:30 PM
What a great card, Donna! I love the way you've extended the card beyond the die as well as the colours you've used. Very striking and masculine! The hardware onto which you've tied your twine is absolutely perfect with the woodgrain background and really adds a rustic feel to the card. Thanks so much for joining our Watercooler Wednesday Challenge this week.
Registered: September 29, 2005 Location: Abbotsford, Bc Posts: 41
Mon, Nov 28, 2016 @ 8:55 AM
What a terrific masculine card. I love that die and it's absolutely perfect for your card. The twine and hardware go so well with it. Thanks for joining us in this challenge at the Watercooler Wednesday blog, and for all your great instructions and guidance with this card.
Registered: September 14, 2005 Location: Pearland Texas Posts: 222
Mon, Nov 28, 2016 @ 4:13 PM
What a great manly card you have created! I love the hardware - great addition! Thanks for playing along with my masculine challenge this week over at Watercooler Wednesday!