You may also click twice on the "Previous" button for more views.
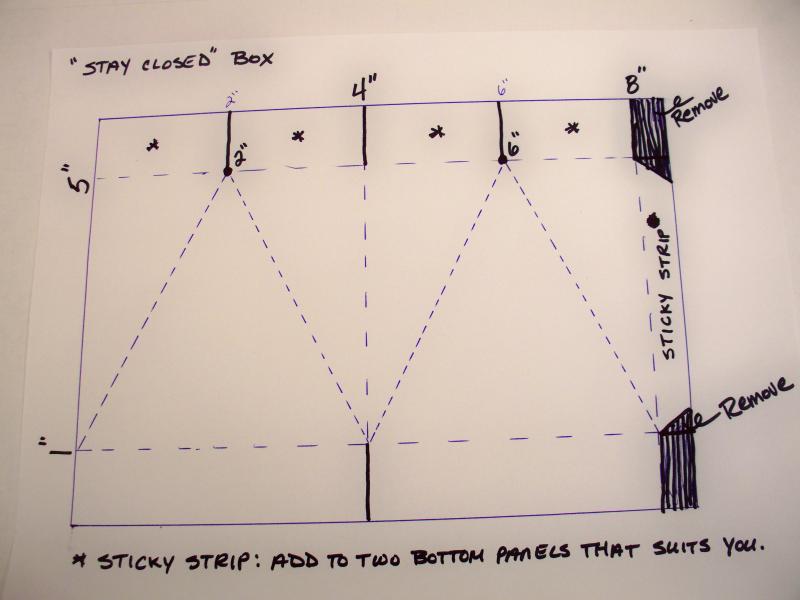
CARD STOCK measures: 8 1/2" x 6"
1. SCORE: Long Side: 4" and 8"
Short Side: 1" and 5"
Back on Long Side, just make a stylus-tool-notch ON THE HORIZ. SCORE LINE at: 2" and 6"
(in hindsight, you could probably just score down to the horiz. line from the 2" and 6" marks as those areas will
eventually be cut, anyway.)
2. RULER: Using a ruler and stylus, score your triangles as shown, from the 2" and 6" notched marks down to the bottom
horizontally scored line, as shown. (Tip: I leaned on the back of a pad for some "give" when scoring.)
3. REMOVE: Small, 1/2" rectangles and notch your tab, as shown. You may add STICKY STRIP to that tab when you are ready to
close your box.
4. CUT: Both 4" score lines down to their first horizontal line as shown.
5. CUT: From the paper's edge down to the tip of each of the two triangles, as shown.
6. DSP: Your box has two 4x4" squares so you will cut TWO DSP panels at 3 3/4" squared, each.
7. DSP: Bend dsp in half and just pinch the center point to mark the dsp's center. (Do not fold DSP in half!)
8. PAPER TRIMMER: Cut DSP from pinched center point down to the opposite, bottom corner on each side to get 3 triangular pieces per square. Adhere to your box with SNAIL.
9. BURNISH: All scored lines on your box. You will by now have added Sticky Strip to your tab and will also add Sticky Strip to your two, outermost bottom tabs to close up your box.
10: DIE-CUT TOP: Please refer to Keren Howell's YouTube video tutorial here:
THANK YOU KEREN!!!
Have fun! Cheers!
Date: Friday, March 13, 2015 GMT Views: 2493
Favorited:15