Heartfelt Creations Products Used:
HCPC 3555 Sweet Memories PreCut Set
HCPC 3554 Love at Christmas PreCut Set
HCPC 3553 Peaceful Night PreCut Set
HCDP1 236 Christmas Card Paper Collection
HCPC 3415 Petite Poinsettia Precut Set
Viva 3d Stamp Paint in Carmine Red
#459222 Paper Blossoms Tool Kit
#159723Art Glitter Dries Clear Adhesive
#352854 Metal Glue tip Art Institute
Other supplies: Spellbinders Layered Poinsettia, 2010 Heirloom Ornament, Std. Ovals Small, and Venetian Motifs, Ranger Distress Ink, Memento Ink, green and red pencils, burgundy card stock, Canson watercolor paper, glue, dimensional tape, chunky glitter, white glitter, flower stamen, yellow marker
Instructions:
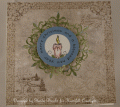
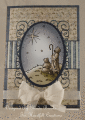
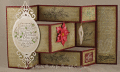
I went to Splitcoast Stampers and found the dimensions and instructions for making this tri fold card and made my card. Once I had all the cuts and folds done I used distress ink to go around all the edges of the card to give it dimension. I stamped the sentiment onto watercolor paper and cut out with an oval die. While it was still in the die, I used distress ink to shade this piece as well. Then I colored in the leaves and berries using the red and green pencils. Next I cut out two of the motifs and glued them to the top and bottom of the oval. The next thing I did was pick a piece of the pretty paper and cut pieces to fit on all the areas of the card. I went around each piece with distress ink to give it an aged look. Now we are ready to adhere the oval piece with the sentiment to the front of the card. I used some dimensional tape to adhere it down. I stamped another sentiment and a pine cone cluster and then cut out some of the sentiments from the pretty papers and glued them into place. Next I stamped and cut out my poinsettia and then colored it with the Viva 3D Stamp Paint in Carmine Red Metallic. I shaped the leaves with the Paper Blossoms Tool Kit and glued them together to form my flower. Next I used a yellow marker to color some white stamen and glued three of these to the center of the flower. Now we are ready to make our glittery hanging ornament. I cut out a ornament using two of the dies to give the piece an opening in the middle. I punched a hole in the top of the ornament and inserted a piece of gold string through and tied it off. Next I applied glue to the front and back of the ornament and added chunky glitter. Once this is dry you can tape the string to the back of the card so the ornament hangs down into an opening. On the back panel of the card I used the glue and some fine glitter to just give it a sparkly look. It doesnÂ’t show very well in the picture, but the glitter gives it a really pretty look.
Date: Tuesday, September 3, 2013 GMT Views: 1277
Favorited:13
Registered: March 11, 2007 Location: In my Garden in West Jefferson, Ohio Posts: 4278
Tue, Sep 03, 2013 @ 3:14 AM
Oh Glenda............I love tri fold cards and this one is a real stunner. I have several bases cut and put in a drawer.... you makes me want to get them out and play. This one is a definite keeper,,,,into my favs.
------------------------------
GardenDiva AKA Tina DeLong
FS363 QFTD182
Fan Club Member & Tuesday Teapotter Hostess MMTPT222
Thyme began in a Garden. Jeremiah 29:11