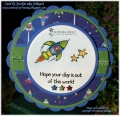
This is a card I made for my nephew's 8th birthday. He loves all things Star Wars which is why I went for a space theme. This card is also for the Splitcoaststampers Free for All Friday F4A163 Glittery Happy Birthday from 5th April where you are to make a birthday card with glitter. I used glittery designer paper ie: the rockets on it are all glittered (but you will have to take my word for it because the camera didn't capture it) and I added glitter to the rocket's flame and on the yellow stars. The 3 star brads on the main image panel are also glittery. See this link for the details on the challenge: F4A163 Glittery Happy Birthday To You! by Jeanne S at Splitcoaststampers
The images/sentiment are by Woodware - Space Cadet - and were stamped onto 140lb watercolour paper using Versafine Onyx Black ink and coloured with Derwent watercolour pencils and a small round #2 paintbrush. I added Glossy Accents to the rocket and Kindyglitz Crystalina glitter glue to the rocket's flame and to the stars. I lightly chalked around the image with Kaisercolour blue chalk. I cut the prongs off the 3 glitter star brads and then attached them to the card with Glossy Accents....so much easier than trying to poke their little prongs through and then getting them all to line up perfectly. Someone suggested using Glossy Accent for adhering embellishments on the forum here at SCS and it works a treat! These Glitter Star brads are by Making Memories - green from Mini Shimmer Star brads set - red and blue from Stars in Bloom Shimmer set.
The middle green panel was embossed using my Big Shot and Crafts Too Stars embossing folder and then I attached some silver/green ric-rac which I found in my stash. The blue border on this green panel was trimmed to 1/8" using my Perfect Layers Tools. I used my Paper Piercer to pierce holes in my blue scalloped circle card base. This scalloped circle was diecut using my Big Shot and one of my Lifestyle Scalloped Circle Nesting Dies. All the other circles on the card were diecut using Lifestyle Nesting Circle dies.
I used one of my Lifestyle Nesting Circle dies to make a white cardstock circle card then attached my finished front panel to it.
The designer paper is by an Australian company: Birch Haberdashery and Craft and has no descriptive name on it - just SP183. FYI, there are robots on the other side.
Thanks for having a peek at my card! Please come and peek at my blog for more photos and a pic of the inside - this link will take you directly to my card: http://instead-of-ironing.blogspot.c...phews-8th
Date: Thursday, April 18, 2013 GMT Views: 1990
Favorited:6
Paper: Birch Haberdashery and Craft SP183, 140lb watercolor paper
Ink: Versafine Onyx Black
Accessories: Big Shot, Lifestyle Scallop Circle + Circle Nesting Dies, Crafts Too Stars ef, chalk, dimensionals, ricrac, Perfect Layers Tools, Kindyglitz, Glossy Accents, Star brads, Derwent w/c pencils, paper piercer, cs: white, grass green, dark sky blue
Techniques: Circle card, diecutting, watercoloring
Splitcoast Dirty Dozen Alumni SCS Gallery Moderator Splitcoast Challenge Hostess Teapot Tuesday TEAm
Registered: July 27, 2007 Location: Dublin, Ireland Posts: 132007
Thu, Apr 18, 2013 @ 7:15 AM
Popping this into my favourites - I love those vivid primary colours (and green), and how well all the different elements work together. Fancy glitter ric-rac working so perfectly on a boy card!!
Registered: September 21, 2006 Location: In the beautiful Sequatchie Valley, Home of the Paper Clip Project - The National Cornbread Festival Posts: 26563
This is absolutely wonderful! I haven't used my watercolor pencils in forever and I love the look of them. The colors are so bright and fun. Just super cute!