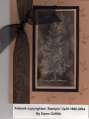
I LOVE doing the Soot Technique. It is much simpler than it looks. I do not use a candle however. I've found an oil lamp with "old fashioned" oil (the kind that is NOT smokeless) works best.
Date: Saturday, August 14, 2004 GMT Views: 2268
Favorited:23
This is beautiful! I did soot stamping years ago but my then very young child kept looking at me with such a weird look I was afraid he'd try to copy me, lol!!
NOTE:
I revised the directions for this technique from the way others do this. Most people use a candle and that just takes too long in my opinion (patience is a virtue I must work on.) :o) Also, in my opinion, using a candle yields mediocre results because it just doesn't throw off enough "soot" to stamp in without catching the paper on fire . . . which always makes for a hopping good time) LOL! So I found another way to do this that I feel works best. Here is what I found out . . . probably not "new" to you ol' pros but thought I'd share for anyone else who hasn't tried this yet.
Oh, by the way choose your location carefully. You don't want to end up with an accumulation of the black soot on your ceiling where are working (hear the voice of experience in that?). . . unless you are planning on stamping on the ceiling too. *Ü*
Materials:
Oil Lamp with oil (I like the old fashioned oil best . . . the kind that does NOT say "smokeless")
Glossy Cardstock
Rubber Stamp
VersaMark pad (optional)
Dye Ink pad (optional . . . for Positive Soot Technique)
Spectrum pad (optional . . . for Rainbow Soot Technique)
Brayer (optional . . . for Rainbow Soot Technique)
"NEGATIVE" SOOT STAMPING:
1. Remove the shade for the lamp and light the oil lamp. Turn the wick up really high so that the lamp begins to smoke.
2. Carefully move the glossy cardstock (glossy side towards flame) over the smoke from the flame. Don't hold it too close so it won't catch on fire. Keep it moving it until you have a thick black soot deposit on the card stock (or a thin deposit, whichever you like best.) Be careful not to burn your fingers.
NOTE: I recommend doing this near a pan of water just in case it catches fire and you need a place to drop it that is safe. Do be careful!
3. Try to hold the cardstock at an angle you will get more coverage faster. Be sure to keep the lamp smoking and the paper always over the smoke. Be especially careful near the edges & corners, they are most apt to catch fire.
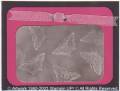
4. When the cardstock is covered with soot to your satisfaction, stamp an uninked stamp onto it. Press firmly but do not wiggle. As an optional approach you may wish to ink your stamp first in VersaMark and then stamp into the soot. This is NOT necessary but does provide other creative options.
5. Lift the stamp straight up.
6. Immediately spray card with a spray fixative. Be sure to not touch it at this point or you'll end up with fingerprints on it. Hold the can above the card, sort of spraying away from the card. Once the stream of spray is coming out evenly move the nozzle toward your card, keeping a 12" distance. If you don't do this, you'll get little speckled pattern on your project from the pressure in the can pushing the soot around on the card. This takes a bit of practice but you'll get it.
Tips:
* It's very difficult to do this on a full size card. I recommend that you cut the card stock into 1/4's and cover each piece with soot one at a time. Cover with Soot, stamp, spray, let dry and then cut out the image and mount it to another piece of cardstock.
* Be careful not to get finger prints on the soot card. Just pay attention to where you are touching it and allow an extra edge that can be trimmed off later.
* Using a clean stamp, you can ink it with an embossing pad or versamark pad and then stamp on the soot. The stamp removes the soot and leaves a bit different effect than if you stamp with just the bare rubber. Be sure to clean stamp inbetween EACH time you stamp on your soot project so you won't get any of it on your VM pad. If inking stamp with VersaMark, try sprinkling EP on it right after you've stamped and then heat. This is a very cool effect! You can also try applying Heat & Stick and then flock, glitter, Pearl Ex . . . to wherever your creative genious takes you.
* You MUST then spray with a fixative. I use Krylons Matte finish sealant but if you want a shiney look then use the Glossy Finish. Sometimes if the soot is thick, your project will require two coats to seal. Apply this in thin coats as directed above so you won't get "spots or speckles" in soot.
* If you want the look of a glossy coat you can apply a thin layer of Future Floor Finish after you've sealed your project. For this option use a different sealer. I choose the Polyacrylic spray by Minwax.
* Clean with Stampin’ mist and a brush if needed. This technique may leave a “stain�? of black on the rubber of your stamp you chose to use. It will not affect the way your stamp stamps. You can also use the Staz On cleaner to remove this stain and then the Stampin' Mist to condition the rubber.
Creative Corner:
* When using this technique with a baby foot stamp you get a result that really looks like an xray. So Cool!!
* You can brayer the glossy card stock with any color stamp pad before you put the soot on to get a different look.
* This technique is awesome when incorporated with the use of the zebra from the Serengetti set!
* You can brayer the glossy card stock with any color stamp pad before you put the soot on to get a different color that will show through were you've stamped. This provides a very different look for your project.
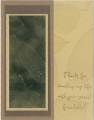
RAINBOW SOOT STAMPING:
Here's a little different spin on the standard soot technique. To make Rainbow Soot Cards use glossy cardstock and brayer on ink on cardstock using a Spectrum pad. Follow the same directions above for getting soot onto card. Once it's covered in soot, stamp an image (no ink) into the soot. This allows the rainbow colors to show through. Spray seal your work.
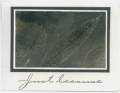
"POSITIVE" SOOT STAMPING:
This twist on the technique applies an inked stamped to the glossy card stock that has just a bit of soot. You are not removing any of the soot (at least that is not the creative intention) and that is why this is referred to as the "positive" soot stamping technique.
Just allow a bit of soot to accumulate on the glossy card stock and then stamp using any dye ink and you are done. Layer as desired to create some beautiful looks. Try the wolf stamp and the new In the Wild set . . . awesome design possibilities there!