I'm trying out for the MFT guest designer position. It's a total long shot but figured that I would do it for fun. This is the only entry that I will do because I know my chances are slim but sometimes you just go for it and have a good time while you're doing it
SUPPLY LIST
Stamps: My Favorite Things (Autumn)
Card Stock: Papertrey Ink (Vintage Cream), Stampin' Up! (Bashful Blue, Very Vanilla),
Designer Paper: Basic Grey (Oxford)
Ink Pads: Memento (Tuxedo Black), Tim Holtz Distress Ink (Walnut Stain), Versafine (Black Onyx)
Markers/Colored Pencils: Copic (E41, E42, E43, E44, R35, R37, R39, YG25), Sakura (White Gelly Roll)
Hardware/Charms/Brads: Stampin' Up! Mini Library Clip (Silver)
Faux Pearls: KaiserScrapbook Self Adhesive Pearls (Denim)
Embroidery Thread: DMC (Black)
Die-cuts: Papertrey Ink (Double-Ended Banner)
Spellbinders Paper Arts Nestabilities: Rectangles
Heat Embossing: Black embossing powder from craft supply
Machine(s)/Tool(s): Heat tool (Milwaukee), ProvoCraft Cuttlebug
Technique: Die-cutting, dry embossing, ink distressing, machine stitching
Size: 5-1/2 x 4-1/4
INSTRUCTIONS
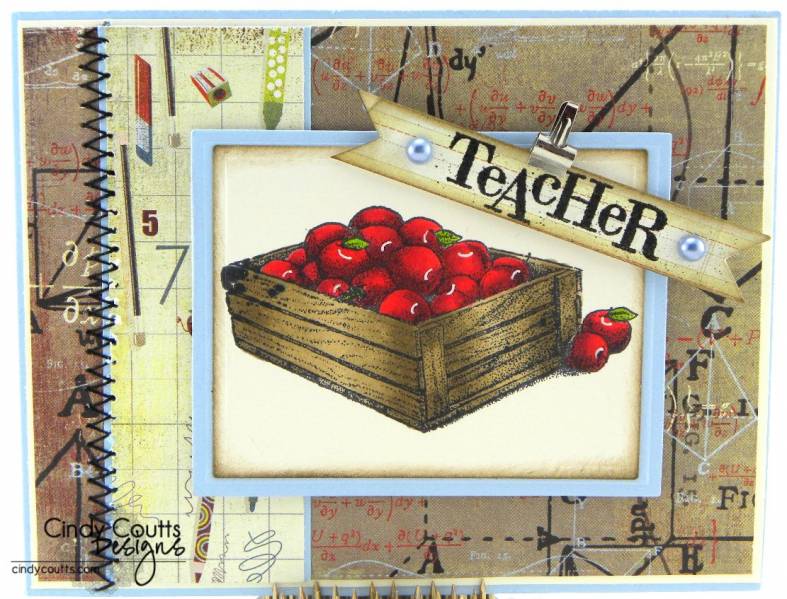
1. Cut light blue card stock to A2 size so that the crease is at the side.
2. Cut cream card stock to 5-3/8 x 4-1/8.
3. Cut a piece of designer paper to 5-1/4 x 4 and adhere to the cream card stock, then adhere to the light blue card stock.
4. Cut another piece of light blue card stock to 1-1/2 x 4 and a piece of designer paper to 1-3/8 x 4. Adhere the designer paper to the light blue card stock and adhere to the base of the card towards the left.
5. Stamp image onto cream card stock with black ink and color in with markers.
6. Die-cut and dry emboss image with a rectangle die and ink distress the edges using dark brown ink. Hand draw a few white curved lines at the top of some of the apples.
7. Die-cut and dry emboss a piece of light blue card stock with a rectangle die and adhere image panel.
8. Place foam tape onto the back of the image panel and adhere to the card in the center.
9. Die-cut a banner onto notebook lined designer paper. Stamp sentiment onto banner with black dye ink, sprinkle with black embossing powder, shake off excess and heat emboss. Ink distress the edges.
10. Adhere sentiment banner to the image panel with foam dots. Attach a silver mini library clip to the center of the sentiment banner.
11. Machine zig-zag stitch along the left side of the small designer paper panel to pierce and hand stitch black embroidery thread through the holes.
Date: Sunday, April 29, 2012 GMT Views: 944
Favorited:2