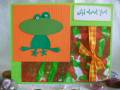
No bonus points for me, I couldnÂ’t find buttons for this card. But I used ribbon and a technique I havenÂ’t done for a very long time which is melted ribbon.
-When I’m not sure I have enough scrap ribbon (the white and orange) I measure the area needed for the card and find a container that is an inch larger than the measurement to allow enough to overlap to the panel back. Tie the ribbon on the container with the knot/bow and if it looks good I use it. In this case the orange ribbon wasn’t enough so I cut it in half and used it only in the knot. Once tied and off the container decide where on the card to place the knotted area and pull the ribbon loop to the edge of the panel and cut ½” longer than needed then tape it to the back.
-To melt the ribbon (I do this before attaching to the card panel) any embossing heat tool/gun will work, do a portion at a time and place a barrier between the ends to melt and the piece that wraps and attaches to the card. Once attached to the card you can place the ribbon where you like it and hold it in place with a tool (scissors work) and give it a little heat and it should stay there.
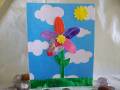
-For the image panel: everywhere you see white is the rubber that comes in contact with the paper so the flowers and stems is the no rubber area of the image. I heat embossed with clear embossing powder, used a sponge dauber to add color to the flowers then used Prismacolor pencils on the stems to get a little touch of green and black for the flower center.
-When I cut the image out after embossing I left a small edge of cardstock that I ink and tool distressed. Once attached to the black panel I could use the finger nail to make a few dips in the tool distressed edge and rolled the two corners down and added the mini brads, oh now I remember I had button brads!!!
-If you look close youÂ’ll see little specks on the flowers, I tried sprinkling what I thought would be the flower color of embossing powder across the panel but it didnÂ’t come out the color I hoped for. Oh well!
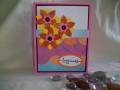
-I punched out a circle of the embossed panel, placed foam tape in the circle and attached the oval panel. This way I know itÂ’s going to stay in place!
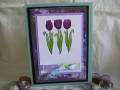
-The inside and envelope is colored with Prismacolor pencils. ItÂ’s not the same image that I embossed.
Tools: heat tool/gun, Stampin up oval punches, mat pack for brad placement, Bazzill piercer, Tonic perforator for tool distressing
Date: Friday, May 21, 2010 GMT Views: 2912
Favorited:29
Registered: June 10, 2007 Location: BC Posts: 44872
Fri, May 21, 2010 @ 9:25 AM
Ohh Roxie!! I just love this image - here's a stamp I need!! What a beautiful card!!! Love it in orange!! Delightful card and into my fav's!!! So gorgeous - you get extra points from me!!!
Registered: July 18, 2006 Location: Beautiful, British Columbia, Canada Posts: 24229
Fri, May 21, 2010 @ 9:29 AM
Just love the image!!! Fabulous card.
------------------------------ "For I am confident in this, that He who began a good work in you will complete it until the day of Christ Jesus" Phil 1:6 Verve Diva My Blog My SCS Gallery