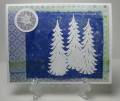
I really do dig winter scenes. :o) So here's another one!! This is using a new technique for me with Crystal Lacquer and die inks. I really liked it!
1. Add several drops of Crystal Lacquer to piece of plastic. Added a few drops of reinker. Place another piece of plastic on top and smoosh them together and pull apart. Repeat until you have a design you like.
2. Add some sprinkles of glitter. Allow to dry.
3. On opposite side of inked plastic, stamp a tree image in white craft ink. Repeat for two more images. Sprinkle with embossing powder and heat set.
4. Cut scrap piece of design paper with 1” punch. Cut white card stock with 1 ¼” punch.
5. Ink up one snowflake on the snowflake boarder image with white craft ink. Tip: To avoid getting ink on the snowflake next to it, first cover area you don't want inked with a low tack sticky paper, ink, and then remove paper before stamping.
6. Stamp snowflake onto 1” circle, sprinkle with emboss powder and heat set.Trena-Nov-Project3a
7. Adhere snowflake circle over white circle layer.
8. Assemble layers.
9. Ink up snowflake boarder and stamp along bottom of inside of card. Re-ink each time.