I think I may finally have an original idea! I haven't checked, so it has probably already been done before....there may even be a tutorial on it, but if there is, then I've re-invented the wheel, because I thought this one up on my own!
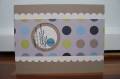
Punch the vanilla with the scallop edge punch and then layer the dp on it. With the 1 3/8 punch, punch through both layers. Do the same with the large circle punch (SU). This leaves the smaller circle to stamp on the vanilla, and also has the large circle to act as a frame.
Stamp the pocket silhouette stamp onto the very vanilla circle, and then place the circle and the card layers onto the base W/O gluing....lift up the layers, leaving the circle. Using the Stamp-a-ma-Jig, line up the pocket silhouette stamp with the circle. Remove the circle and stamp the silhouette image again. Now you can glue everything down.
The thanks is from the same stamp set, stamped onto a scrap of baja breeze and punched with the 1/2" punch.
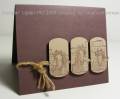
The first time I tried this, I used Kiwi as a base, and the colors looked great, but I stamped a sentiment along the bottom, so it took away the CAS effect I was going for.
Thanks for looking!
Date: Thursday, May 14, 2009 GMT Views: 281
Favorited:6
Registered: July 14, 2004 Location: Living imperfectly with great delight! AB, Canada Posts: 3325
Thu, May 14, 2009 @ 11:53 AM
This really does stand out! Nice card.
------------------------------ Smiles and laughter, Laurie
Finally I have a Blog..come visit and lend me a hand decorating with some of the nifty sidebar thingys! LOL http://www.actofstamping.blogspot.com/