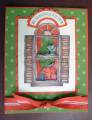
I colored the image with prisma pencils (no gamsol). I cut a window in the riding hood red card base with square nestabilities, and on the back I adhered confetti cream cardstock, the size of the card front, then cut out the image with the same die and sponged the edges with old olive and put it in the window (adhered it on the confetti cream backing.)
Date: Wednesday, November 5, 2008 GMT Views: 738
Favorited:6
Your card is wonderful! Can you tell me why you needed to cut the image out and then adhere it into the window. Couldn't you have merely stamped it onto the backing?
I really love the effect you have achieved and am trying to visualize.
Splitcoast Dirty Dozen Alumni Creative Crew SU Design Team Alumni
Registered: May 6, 2007 Location: Alpharetta, GA Posts: 1484
Thu, Nov 06, 2008 @ 9:25 PM
ok, so I started to make a window card, but then I realized because the image was too large, there won't be space for writing. And I wanted the image to pop out somehow, as well to put the ribbon on the frame, if it wasn't cut out, I wouldn't have been able to put the ribbon as it is, but instead probably punch out with the slit punch or small circle punch to thread the ribbon.
I wanted as well the image to not be above the card front, but at same level, or below (like in window cards).
As well the card front, as it was cut out was kind of whimpsy, and the backing added extra support.
------------------------------ Splitcoast Dirty Dozen Alumni visit my blog