Ladies,
The link goes to a blog that is no longer public because I no longer represent stampin up.
However, I copied the old post and pasted it here.
Here is a new tutorial using all SU supplies:
According to
this website, the definition of Pergamano is " Also known as Parchment Craft. This arts and craft skill is relatively new to North America. Designs are created on thick parchment paper using a combination of inks, dry embossing, and paper perforation.
Parchment Craft originated in Europe centuries ago. Monks and nuns used it to create Holy art works. Pergamano International re-introduced the craft in The Netherlands in 1987, where it gained instant popularity. The craft quickly spread to other European countries, and then to South America.
Source
While "real" Pergamano supplies are available through the
Pergamano company, the
Pergamano technique can be created with Stampin' Up! supplies.
I've always had a love for lacy things. Perhaps that is because my ancestors where Belgian - born and raised near Brussels - the Lace capital of the world - their last names were Arkels, De Keyser, Van Der Gooten, Michels, Brabant, Bredael, Pirlet.
Materials:
- your Crafter's Tool kit
- Paper Snips
- Vellum cardstock
- On Gossamer Wings stamp set
- Canvas stamp
- Sage Shadow cardstock, Handsome Hunter cardstock
- Inks: White Craft, Handsome Hunter, Perfect Plum, Chocolate Chip, Summer Sun
- Silver Brads, Aquapainter, Future Floor Wax or markers, Heat Gun, Dimensionals
- Ribbons of your choice
Instructions:

Take a piece of vellum size about 3 1/4 by about 3 1/2 inches
Stamp your images in white craft ink.

Heat set to dry.
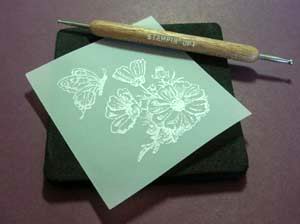
Turn your vellum over and using a stylus and mat in your
Crafter's Took Kit, dry emboss the outline of your image.


Turn the vellum back over to the front side.

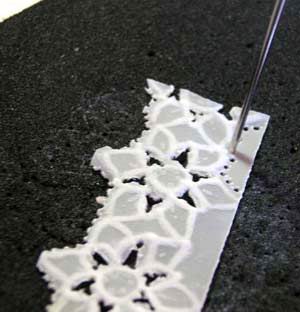
Punch holes in areas of your background where you would like "shading"

Using your Paper Piercing template, emboss a line on all 4 edges.

Line up your Paper Piecing template so that there is a row of holes
above and below the dry embossed border.

Punch the holes.

Using your paper snips, snip the vellum between the dots in your border

Add some swirly lines freehand to the image using your stylus

Turn your vellum over and color in your images as desired using either
markers or Aquapainter, Future Floor Wax and ink pad.
You can use a regular marker to create a bold color or
you can use an aquapainter filled with Future Floor Wax and pick up ink
from your ink pad and color in the image.
I recommend using Future Floor Wax for this instead of water.
The Future Floor Wax will pick up the ink color and make it "stick" to the vellum
I like the more subtle look of using the Aquapainter and Future Floor Wax.

Remember to clean your ink pad cover with a baby wipe after dipping your wax-filled
aquapainter to pick up color.

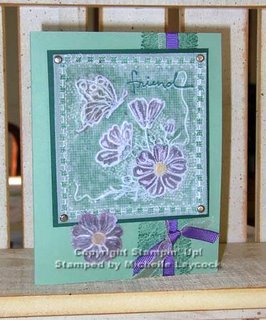
The back side:

The front side:

Stamp your canvas stamp using Handsome Hunter ink onto Sage Shadow paper.
Stamp the word "friend" in White Craft ink onto the vellum.

Stamp "friend" again in Handsome Hunter ink, slightly above the white stamped "friend" to create a shadowed look.

Secure vellum to Sage Shadow cardstock using silver brads.

Stamp your cardfront, add ribbon.
Mount vellum piece onto Handsome Hunter, then onto your cardfront using dimensionals.
You may wish to add a cut out flower to accent the card as shown.
You are done!
Here is another project:

Materials:
- your Crafter's Tool kit
- Vellum cardstock
- Natural Beauty stamp set
- Sweet Shapes (regionals) stamp set or Simple Shapes stamp set
- White cardstock, Ruby Red cardstock
- Inks: White Craft, Ruby Red, More Mustard, Really Rust, Summer Sun
- gold cord, eyelets, Aquapainter, Future Floor Wax or markers, Heat Gun, Dimensionals
Instructions:

Take a small piece of vellum
(about 2 by 2 inches, you'll trim it down later)

Stamp your flower in white craft ink.

Heat set to dry.

Turn your vellum over and using a stylus and mat in your
Crafter's Took Kit, dry emboss the outline of your image.

Turn the vellum back over to the front side.
We will now create perforated cutouts in the negative space of the image.

Using one of your needles in the Crafter's Tool Kit,
punch holes along the inside of the negative space of your image.
Then gently take your needle and tear the vellum in-between the holes

Be careful not to pull the needle too hard.

Turn the vellum back over and color the flower with your choice of ink.
You can use a regular marker to create a bold color or
you can use an aquapainter filled with Future Floor Wax and pick up ink
from your ink pad and color in the image.
I recommend using Future Floor Wax for this instead of water.
The Future Floor Wax will pick up the ink color and make it "stick" to the vellum
I like the more subtle look of using the Aquapainter and Future Floor Wax.

Prepare your white cardstock and stamp your images in a collage
on the front of your card in various ink colors.
Mount your Pergamano image on colored cardstock, add a gold cord
Color in the yellow flower center with a marker
Mount on your card with dimensionals

No need to use any tools to make these eyelets straight,
just make your holes by punching every other dot in your square dots stamp!
You are done!
Other samples:


Perforation details:

The following are in the November Splitcoaststampers DD Gallery and you will need to have a fan club membership to view them:
Happy Wedding Day with Toile Blossoms stamp set
Snowflakes Classy Brass
Christmas Rose
Pearls for the Bride with the Damask stamp
Celtic Christmas
Christening Cross


