Splitcoaststampers.com - the world's #1 papercrafting community
You're currently viewing Splitcoaststampers as a GUEST. We pride ourselves on being great hosts, but guests have limited access to some of our incredible artwork, our lively forums and other super cool features of the site! You can join our incredible papercrafting community at NO COST. So what are you waiting for?
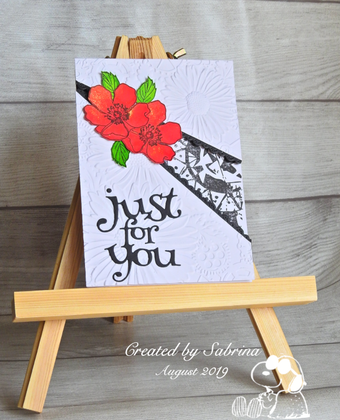
Happy Monday to you all. I was going to go for a fun interactive card this week, but didn't have time to try it out myself, so I've chosen a simpler option which I hope you will enjoy trying. It's a great way to showcase some pretty paper. Mostly I've seen it called a Recessed Panel Card, although I've also seen some people calling it a Split Panel card. I'm sure most of you have seen them around...essentially you start with a piece of card the size of your card front and cut a strip out of it - it could just be a straight strip, or more commonly a diagonal from one corner across the card. Add a matting layer along the edges of the split, and pop it up on your chosen base paper (or stamped pattern) with dimensionals, or with fun foam for a sturdier card.
The video I've attached shows a vertical parallel strip, my sample shows a diagonal.
The width and angles of your strip are totally up to you. Also how economically you use your card and paper is your call...if you're feeling really extravagant you can start with three pieces the size of your card front - the top layer, the recessed layer and the matting colour. Or you can be frugal and just start with one card front size for the top layer, add narrow strips for the matting, and cut the designer paper to fit the area that will be exposed (or stamp within this area).
There are plenty of videos out there, but I'm adding one (not mine) which just shows you all you need to know without spending a lot of the time on colouring. Since there are no strict rules about measurements, they're not crucial. However, I've included the measurements that I used in my step-out photos.
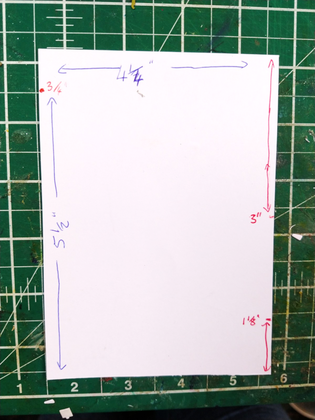
1: Start with a piece of card the size of your card front.
Imperial measurements are in the photo.
For metric users, the point on the top left corner will be 2 cm down from the top. The two points on the right are about 8 & 12 cm from the top. But it's not precise - you can vary this.
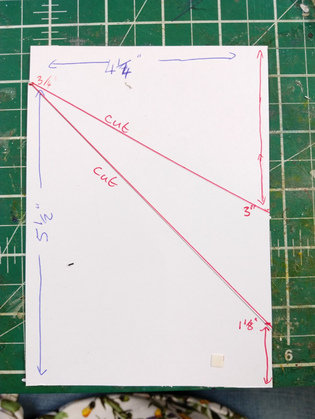
2: Cut from the top left mark to both the marks on the right edge. You can discard the centre wedge. If you like, you can dry emboss the remaining pieces. You might find it helpful to mark on the back which lines form the split across the card, so that you know which edges to trim in the next step.
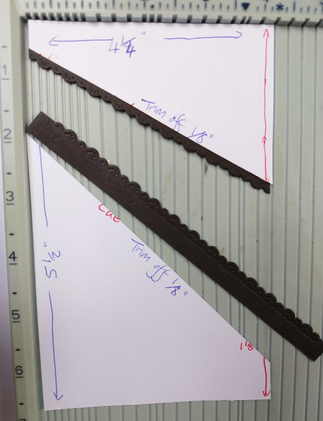
3: Trim 1/8 " (about 1/2cm) off the two inside edges - you will be effectively adding this back with the matting layers.
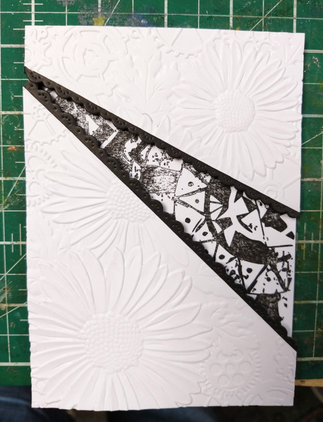
4: Trim two strips of card in a contrasting colour, to add narrow borders to your front pieces. In the photo I used a narrow decorative die, or you can just leave them straight. Attach them to the back of the card pieces - you'll probably need to trim overhanging edges off to neaten it up.
5: Pop these two pieces up on fun foam/foam tape/dimensionals after first decorating your card base with stamping or DP in the area that will be exposed between your two raised panels.
6: And finally, decorate your card to finish it off.
The photo step-out tutorial is available as a pdf attached below, and as a Google Doc if you click HERE.
Remember to use the keyword TLC757 when you are uploading. It's helpful (to the hostesses for sure!) if you come back and leave a link on this thread .
If you're not sure how to link your card on the thread here, here's how:
1. Open 2 windows or tabs: one window for your card and one for this thread.
2. In this thread, click on reply and type anything you want to show before the link.
3. Go to your card window. Highlight the address for your card. (It says www. splitcoaststampers.com/gallery/showphoto..... and so on)
4. Click EDIT. Click COPY
5. Go back to this thread. Click PASTE.
Thanks for a great technique and instructions Sabrina! I agree with Anita, that red floral card is beautiful too! I'm gone today, but hope to try this technique later.
__________________ Judy aka Gracie "Be a rainbow in someone else's cloud." Maya Angelou
I've been wanting to make a recessed panel card for ages . . . .This one took me for ever as first I couldn't decide on a theme pulling out flowers, then butterflies - Then leaves - ad nauseum wasting a good hour and a half . . . I finally settle on Halloween and then the real fun began . . . . (see description)
I really like the look, and possibilities of these Panel Recessed cards, Sabrina. My brain cells worked hard as I made some major mistakes, but kept with it, leading down the long path of artistic problem solving. I jumped off of ruby-heartedmom bee's eye view card: ATC Recessed Panel Cardcard and did this version of dragonflies overhead. TLC757 Dragonflies Above. Thanks!
Jeremiah 29:11 Splitcoast Dirty Dozen Alumni | Proud FanClub member since 2017
My Gallery | My Blog "The wind of Heaven is that which blows between a horse's ears."
__________________ The Difference Between Try and Triumph Is Just A Little Ump Wednesday: Alpha Challenge
Thursday: Ways To Use It Challenge
Monthly: MMJ Challenge….get inky and have fun
__________________ The Difference Between Try and Triumph Is Just A Little Ump Wednesday: Alpha Challenge
Thursday: Ways To Use It Challenge
Monthly: MMJ Challenge….get inky and have fun
Not sure what we'd call a 'faux' recessed panel card, but mine ended up looking very similar to the real thing: TLC757 - Faux Recessed Card. This was a fun challenge, thank you!
__________________
I Love to Make Things Beautiful and to Make Beautiful Things.