Splitcoaststampers.com - the world's #1 papercrafting community
You're currently viewing Splitcoaststampers as a GUEST. We pride ourselves on being great hosts, but guests have limited access to some of our incredible artwork, our lively forums and other super cool features of the site! You can join our incredible papercrafting community at NO COST. So what are you waiting for?
I am starting over again with organizing my own stamps as well as a huge collection of recently acquired stamps from my sister. I have read many posts and ideas and get more confused as to what I want to do. I believe I have settled on wanting binders. I noticed quiet a few posts refer to using a laminating machine and laminating their own panels vs. purchasing EZ Mount Storage Panels. Is this because it is more economical?
Thanks Cathy! I saw the storage panels on sale for 1/2 price and was thinking about it. I think I will look for a laminator. What do I need to look for?
THIS is the laminator that many of use, and THESE are what many of us use to laminate regular, cheap cardstock. Some cut them in half; I cut mine down to fit in 4" x 6" photo sleeves. The size you cut them to will be determined by what you plan to store them in. Regardless, this is SO MUCH cheaper than buying panels, and it's easy to laminate more when you need them (not IF, but WHEN - you'll probably find you need more than you thought for various reasons).
__________________ ~ Sue Happy for no reason...
Last edited by gregzgurl; 06-07-2016 at 03:36 PM..
Reason: fix link
Just making sure I understand. If I order 8 1/2" x 11" pouches, I can cut them down to 4" x 6" and laminate only that or do I have to do the whole sheet? Sorry, I am just learning this method of storage. Thanks for your help!
You can make the decision as to how you want to do it. I'll give you the recommendation from the manufacturers first.
They say laminate your cut item in the pouches (you can put several in a pouch if you leave space between) and cut the laminating film leaving 1/8 inch sealed around your item. There is something to be said for this. Your item is completely sealed. Water, or ink, or rough handling won't make a mess of the paper inside because it isn't exposed at all.
Now, what you can do. Laminate full sheets and cut the whole thing to the sizes you want. This leaves your laminating film going to the edge of the paper but not enclosing it.
Now, if I were going to do binders I would want the page completely sealed. Flipping thru the pages will definitely cause the paper between the film to begin to separate. So I would cut the cardstock to the size you want...or a tad smaller since you'll be leaving about 1/8 inch of film outside the cardstock...and then laminate it. Trim the film afterwards, leaving that 1/8 inch outside the card.
And, just for aesthetics, and maybe your comfort too, round the corners of the cardstock before laminating. Then you can trim the film around the corner and not have sharp corners.
I'm going to play devil's advocate here: I laminate an entire sheet of cardstock, cut it to size (I don't leave the recommended 1/8" or anything else). I've used the same cards for several years with no separation. If a card gets too grungy or gooped up (glue issues, which is why I'm switching to poster tape) then I toss it and laminate new ones. It's cheap enough and easy enough and I don't have to do it often enough to make it bothersome...
If you cut the pouch before laminating you can really only use the "hinged" part of the pouch and have to toss the rest, as it will probably not go through the laminator properly. I suppose you could fold the remainder so it was essentially "hinged", but I'd still be a bit wary. I've had to disassemble my laminator several times to get the mess wrapped around the rollers un-done because of some hare-brained idea I tried...
__________________ ~ Sue Happy for no reason...
Last edited by gregzgurl; 06-07-2016 at 06:10 AM..
I'll throw in my two cents worth on the binder method ... I started that way but found the binders got very heavy very quickly. I've since switched to the Avery Elle pouches that I can flip through easily in lighter containers. I've been cutting down my existing EZmount panels to fit the pouches but am considering getting my own laminator once I use up my existing stash of EZMount panels. I do recall in another post on here somewhere that there was talk that not all laminator pouches are archival friendly so be sure to research the "ingredients" in the pouches so that you're not using the kind that cause a chemical reaction with stamps and cling foam. If I can find that post, I will link it here. I hope this is helpful.
__________________ Leslie Harnish
Sambro, Nova Scotia
Canada
I'll throw in my two cents worth on the binder method ... I started that way but found the binders got very heavy very quickly. I've since switched to the Avery Elle pouches that I can flip through easily in lighter containers. I've been cutting down my existing EZmount panels to fit the pouches but am considering getting my own laminator once I use up my existing stash of EZMount panels. I do recall in another post on here somewhere that there was talk that not all laminator pouches are archival friendly so be sure to research the "ingredients" in the pouches so that you're not using the kind that cause a chemical reaction with stamps and cling foam. If I can find that post, I will link it here. I hope this is helpful.
Diane did that for the Royal Sovereign pouches (cuz she's cool like that) and they're safe...
Thanks Diane and Sue! I understand what you both are saying. It sounds like even though the cardstock is laminated that it is put in a page protector, so that is probably why their isn't any separation. You have been a BIG help! Now I'm off to push that Amazon button :-)
I'm going to play devil's advocate here: I laminate an entire sheet of cardstock, cut it to size (I don't leave the recommended 1/8" or anything else). I've used the same cards for several years with no separation. If a card gets too grungy or gooped up (glue issues, which is why I'm switching to poster tape) then I toss it and laminate new ones. It's cheap enough and easy enough and I don't have to do it often enough to make it bothersome...
If you cut the pouch before laminating you can really only use the "hinged" part of the pouch and have to toss the rest, as it will probably not go through the laminator properly. I suppose you could fold the remainder so it was essentially "hinged", but I'd still be a bit wary. I've had to disassemble my laminator several times to get the mess wrapped around the rollers un-done because of some hare-brained idea I tried...
Sue, would you please explain about switching to poster tape. I think in the past you've used a diluted tacky glue on your bare rubber stamps. many thanks for any and all information.
Carolyn
__________________ mcw519 m Carolyn w
Fan Club Member
EZ mount and clear polymer both stick to laminated cardstock wonderfully.
As Sue says above, I use Royal Sovereign pouches that I buy at Sam's Club. That was the best price. And I contacted them to find out what type of plastic is in the pouches...so that I could confirm that they are safe.
Thanks Diane and Sue! I understand what you both are saying. It sounds like even though the cardstock is laminated that it is put in a page protector, so that is probably why their isn't any separation. You have been a BIG help! Now I'm off to push that Amazon button :-)
Well, kind of. Both Sue and I laminate cardstock in order to have a surface to stick stamps to. I used page protectors for pockets and Sue uses photo album pockets...the purpose being to contain the card and the stamps. Don't want stamps coming loose and disappearing.
The potential separation issue is another issue altogether. Sue hasn't had any, and I don't anticipate it. But at church we have problems sometimes. Lets say that I want a bunch of laminated letters for the bulletin boards. I have two ways to do that.
...Cut the letters out, then laminate and trim the lamination, leaving a clear border around the letter.
...Or laminate sheets of paper, then laminate, then trace off the letters I want and cut them out.
Do you see that the end result is different? In the first instance when I put them on the bulletin board then all the shoulders rubbing by don't have any effect on the letters. But in the second, the layers of paper start peeling apart. The laminating stays stuck just fine, but you could definitely completely separate the paper into 2 layers.
Think about what happens to the corners of a paperback book that has a laminated plastic film on the cover. The corners and/or edges still peel apart.
But I don't intend for that kind of abuse to my storage cards! The main problem would be water getting in the edges. Solution: don't let it!
Thanks for the explanation. I get it now. Can't wait for my laminator to get here! I have finished the purging process and now ready for unmounting and storage organization.
I keep my stamps in the Ellen Hutson storage envelopes here. I don't know how these compare to the Avery Elle ones but I love these because they are a nice heavy duty vinyl and they are pretty inexpensive. I have some Tim Holtz stamps in binders and I find it to awkward to flip through, so I prefer my little envelope method. And I don't laminate anything to keep my stamps on. Many years ago I bought a ream of Neenah Natural White card stock that I hardly ever use so I just cut that down to fit in the envelopes and I slide my clear stamps (still on the acetate they come with) into them. I keep all the envelopes in Fridge Binz and it's pretty easy to flip through them to find what I want.
__________________ I hope you have time to visit my blog. For great sketch challenges visit Freshly Made SketchesFor great inspiration challenges visit Fusion
The pockets from Ellen Hutson are noticeably thicker. I have both and use them for dies stored on magnetic sheets. If I have quite a few pieces in the set or it's a set I know I am going to use a lot, I use the heavier pockets from EH. The Avery Elle ones tear at the corner much easier.
Teatime2, yes it is about the best way to store unmounted stamps. Some people like to laminate cardstock to put their stamps on; put them in page protectors, then store in a binder. Others follow similar steps but put them in envelopes like Avery Elle and put them in baskets or Frigz Binz. Still some people use EZ Mount Storage Panels in place of the laminated cardstock. That is the Reader's Digest version. There is a very diverse group here with lots of great ideas. So bottomline, you learn from either your own or other's mistakes and do what works for you
I keep my stamps in the Ellen Hutson storage envelopes here. I don't know how these compare to the Avery Elle ones but I love these because they are a nice heavy duty vinyl and they are pretty inexpensive. I have some Tim Holtz stamps in binders and I find it to awkward to flip through, so I prefer my little envelope method. And I don't laminate anything to keep my stamps on. Many years ago I bought a ream of Neenah Natural White card stock that I hardly ever use so I just cut that down to fit in the envelopes and I slide my clear stamps (still on the acetate they come with) into them. I keep all the envelopes in Fridge Binz and it's pretty easy to flip through them to find what I want.
I used to do exactly what you're doing, minus the envelopes (because it was "back in the day" before there were any...). I kept my stamps pretty much in their original packaging and just flipped through them. I can't do that now because it's rare that I have a complete set (I give away images/sentiments I know I won't use), and the incomplete sets are all split up. I have to save as much space as possible, so I mix everything up on the laminated cards in the photo sleeves and live happily ever after!
Sue, would you please explain about switching to poster tape. I think in the past you've used a diluted tacky glue on your bare rubber stamps. many thanks for any and all information.
Carolyn
I used to use Sailor 2-in-1 glue that came in a big, chunky chisel-tip marker (recommended to me by a vendor at a stamp expo years ago). It worked amazingly well - great cling, no residue, easy to scribble the marker on the back of the stamp - but I can't find it ANYWHERE any more, so I have to assume that it's been discontinued. I've tried other suggestions - Tack It Over and Over, Tombow Monomulti, etc. - but they always come up short.
I'm slowly going through my stamps and removing whatever glue is on the back (it rolls off rather easily) and leaving them bare. I stick them to my laminated sheets with a bit of poster tape, but just use them with Tack N Peel when I'm stamping. As others have done, I have the TnP on cling vinyl so I can put it on the lid of my MISTI and take it off when I'm done stamping or I'm switching to photopolymer stamps. Others dedicate acrylic blocks with TnP on them permanently.
There are two options of tape out there that work: POSTER TAPE is what I'm currently using, because it's what I could find and I knew it would work. I've now re-discovered my favorite, which is THIS ONE. The advantage is that there's no liner to deal with...
I put it on the rubber, then stick it to the sheet. When I pull the rubber off to use it, the tape almost always stays on the sheet (thankfully), so it's not interfering with the TnP and it's easy to see where to put the rubber back. So far I'm very pleased...
I just wanted to back up Sue's recommendation for Tack n Peel. I've used just about everything in the naked rubber use and storage category. One time I saw the TnP on sale at Joann.com for a ridiculously low price and grabbed some up. And I bought a separate set of blocks to put them on. I have a digital jpg file folder system on my hard drive for my stamps, so I fill up VHS cases with my naked rubber (because I needed to recycle them) -- I just find the naked rubber stamp I want to use in my computer files and it tells me what case to pull. I thought about lining cd cases with the TnP, but don't really have a huge reason to at this point. Anyway, the TnP is like driving a Lexus after driving a golf cart in my opinion. You do have to bite the bullet price-wise unless you can find it on sale. But, I definitely think it is worth it 100%. I would even pay non-sale price for what I bought if I had to do it all over again.
Sue, thanks for that poster tape link. If I get any issues with my Tombow covered stamps, thats what I'll switch too.
Just for help, here is me laminating sheets:
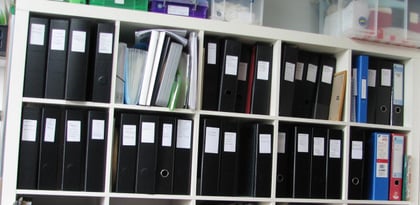
I just use any cardstock I have too much of that I know I won't use, and here are my binders:
The four in the top left square, and then the row of 5 squares below all contain binders of stamps. I've just finished a bit of re-organising, and removal of cling foam as far as possible. Only have a handful left now with it on, and that'll come off in time.
By the way, I decided to buy a laminator and do my own, after I ordered some storage sheets from an online shop. When they arrived, I realised that's all they were- just sheets of laminated card with a logo on!
I use the cheap cardstock from Walmart, myself. Tip on removing cling foam from stamps - put those babies in the freezer for a few minutes! The glue hardens and you can pull the rubber right off...
I just wanted to back up Sue's recommendation for Tack n Peel. I've used just about everything in the naked rubber use and storage category. One time I saw the TnP on sale at Joann.com for a ridiculously low price and grabbed some up. And I bought a separate set of blocks to put them on. I have a digital jpg file folder system on my hard drive for my stamps, so I fill up VHS cases with my naked rubber (because I needed to recycle them) -- I just find the naked rubber stamp I want to use in my computer files and it tells me what case to pull. I thought about lining cd cases with the TnP, but don't really have a huge reason to at this point. Anyway, the TnP is like driving a Lexus after driving a golf cart in my opinion. You do have to bite the bullet price-wise unless you can find it on sale. But, I definitely think it is worth it 100%. I would even pay non-sale price for what I bought if I had to do it all over again.
Joann.com has TnP 40% off right now. I was also able to use the following code to get an additional 15% and $4.99 shipping. Just sharing in case some is in need of TnP.
I just wanted to back up Sue's recommendation for Tack n Peel. I've used just about everything in the naked rubber use and storage category. One time I saw the TnP on sale at Joann.com for a ridiculously low price and grabbed some up. And I bought a separate set of blocks to put them on. I have a digital jpg file folder system on my hard drive for my stamps, so I fill up VHS cases with my naked rubber (because I needed to recycle them) -- I just find the naked rubber stamp I want to use in my computer files and it tells me what case to pull. I thought about lining cd cases with the TnP, but don't really have a huge reason to at this point. Anyway, the TnP is like driving a Lexus after driving a golf cart in my opinion. You do have to bite the bullet price-wise unless you can find it on sale. But, I definitely think it is worth it 100%. I would even pay non-sale price for what I bought if I had to do it all over again.
I COMPLETELY concur that it's well worth full price for the Tack N Peel! I heard about it years ago but always nixed the idea for one reason or another - no idea why now. What a doh-head I've been! It's by far the easiest way to go about this whole more-stuff-in-less-space thing that is my overarching philosophy in papercrafting storage/organization!
I've thought about not having the rubber on storage panels but just in a container of some sort, since they wouldn't stick to each other or anything, but I have to have the photopolymer on panels, so I just include the rubber, too. It's easier (for me) to find which stamp I want, as well.
I cut up boxes (cereal, crackers, etc.) to laminate for my panels. I cover them with the Georgia Pacific cardstock you can get at Walmart or Sam's, then laminate. I don't have mine in envelopes of any kind and have never had any stamps fall off the laminated panels perhaps because they are much heavier than just the card stock.
Thanks Cathy! I saw the storage panels on sale for 1/2 price and was thinking about it. I think I will look for a laminator. What do I need to look for?
Many years ago in a far away land, I purchased a 3M laminator along with the 3M pouches. Could I use this laminator and pouches to laminate cardstock?
Many years ago in a far away land, I purchased a 3M laminator along with the 3M pouches. Could I use this laminator and pouches to laminate cardstock?
Thanks your help!
Teri, I am new to the laminator. In fact, I just ordered the one recommended on this site. Hopefully, someone will be able to guide you on different brands that work well.
Many years ago in a far away land, I purchased a 3M laminator along with the 3M pouches. Could I use this laminator and pouches to laminate cardstock?
Thanks your help!
Shoot 3M an email and ask what the pouches are made of. I don't remember what the safe/not safe materials are (there's a thread for that, but I'm too lazy to find it and once I knew that what I was using was okay I decided not to care...), but you could post here and whoever-it-is that knows could tell you (or you could get all crazy and track down the thread)!
The 3M laminator would be fine, and the only advice I can give is that I've been purchasing my pouches from our �1 ($1) stores for the last few years since I started doing this- probably 5+, and I find no problem with any of my stamps, even the poorer quality type magazine freebies are not breaking down or sticking to the sheets. I'd also have to admit that when I did start doing this, it didn't occur to me that there could be good/not good pouches,as the ones I'd bought had been laminated cardstock. I think it's all got so technical due to the variety of materials that clear stamps seem to be made from?I'd do as Gregzgurl suggests and email them, see if they can help.
Hello! I just wanted to everyone know I emailed 3M this morning. They said to allow 24-48 hours for a response. I will let you all know what I find out.